Git can become overwhelming after a while. There are so many ways of working with a git repository and collaborating with other developers on multiple branches. This is a simplified version of how to work with git which covers a lot of common scenarios. Once you get these basics, official git documentation is quite easy to follow in special use cases.
To follow this post you can setup a remote repository in Github, Bitbucket, or Azure DevOps.
Basics
Get the source code (repository) or clone
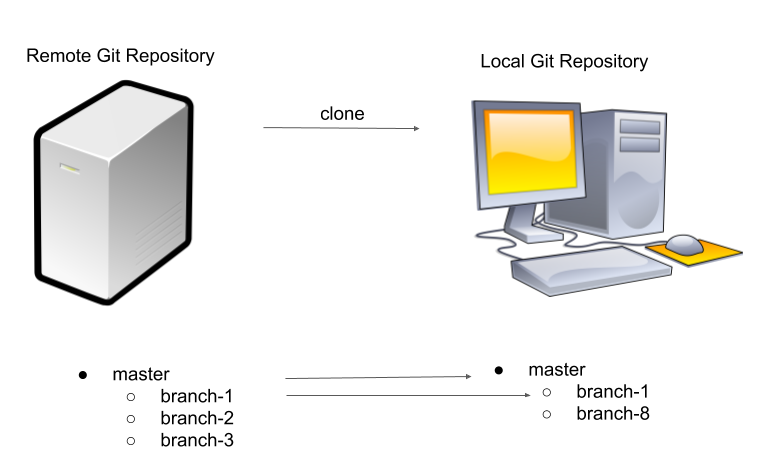
To start working on any project, we need to get the source code. Assuming we have never configured the project on a new machine, we need to clone the repository:
git clone https://github.com/arminkarimi/simple-git-cheat-sheet-test
If you are working on a private repository, you might be asked to provide a username and password to authenticate against the repository.
When you clone a remote repository, you need to be aware you are dealing with two git repositories. Your local git, and the remote git. Basically, we use the local git to divide the development work to smaller chunks (commits) and then we synchronize (push and pull) the local changes with the remote git, to share with other developers. For me, the hidden advantage is, if my computer is lost, my projects will live forever.
The master branch
The main branch in the repository is called master. You should almost never work on the master branch directly. However, if you are simply browsing the code or want to run the latest approved version of the code locally, checkout the master branch.
Note: check with the repository owner to make sure master is the main branch. Some teams use a different branching strategy.
Find where you are or status
Sometimes you simply want to find which branch you are currently working on, do you have any changes pending, or even whether you have the latest version of the code. Simply put, what is the state of your branch:
git status
- Everything is up to date on master branch:
MacBook-Air:simple-git-cheat-sheet-test arminkarimi$ git status
On branch master
Your branch is up to date with 'origin/master'.

nothing to commit, working tree clean
- There are some changes to the local README.md file:
MacBook-Air:simple-git-cheat-sheet-test arminkarimi$ git status
On branch master
Your branch is up to date with 'origin/master'.

Changes not staged for commit:
  (use "git add <file>..." to update what will be committed)
  (use "git checkout -- <file>..." to discard changes in working directory)

        modified:   README.md
- remote master branch has some changes:
MacBook-Air:simple-git-cheat-sheet-test arminkarimi$ git status
On branch master
Your branch is behind 'origin/master' by 1 commit, and can be fast-forwarded.
  (use "git pull" to update your local branch)

nothing to commit, working tree clean
Get the latest or pull
Git branches on your local machine can easily be outdated (behind) compared to branches on a remote git. To get the latest changes from a branch on remote git, checkout the branch. Then run:
git pull origin master
MacBook-Air:simple-git-cheat-sheet-test arminkarimi$ git pull origin master
From https://github.com/arminkarimi/simple-git-cheat-sheet-test
 * branch            master     -> FETCH_HEAD
Updating 07d6626..b7e7669
Fast-forward
 README.md | 3 ++-
 1 file changed, 2 insertions(+), 1 deletion(-)
Branches
Switch to a branch or checkout
To switch to master branch browse to the folder you have cloned the project. Then:
git checkout master
Create a new branch
There are many ways to create a branch. Here is one simple way:
git branch modify-readme-content
However the problem with this method is you then need to checkout the branch to be able to switch to it:
git checkout modify-readme-content
A more practical approach is to do the following which basically combines the two previous commands. Adding -b to the checkout command will create a branch and switches to it at the same time.
git checkout -b modify-readme-content
MacBook-Air:simple-git-cheat-sheet-test arminkarimi$ git checkout -b "armin/modify-readme-content"
Switched to a new branch 'armin/modify-readme-content'
Branch Names: When working in a team, start your branch names with your first name and then give a meaningful name to your branch. For example, "armin/user-login-form". If you are using a project management tool like Azure DevOps or Jira, add the story number to the branch name and it will make it really easy to search through branches and automate the workflow when the number of branches grow: "armin/4512-user-login-form"
View all branches on your machine (local)
To view all the branches on your machine:
git branch
MacBook-Air:simple-git-cheat-sheet-test arminkarimi$ git branch
* armin/modify-readme-content
  master
The asterisk (*) shows which branch you are currently on.
Contribute Code
Save your changes locally or commit
Add all the files:
git add -A
Save them to your branch:
git commit
After code commit you will be asked to add a commit message. A more practical approach is to do the following which basically combines the two previous commands:
git commit -m "added user login form"
MacBook-Air:simple-git-cheat-sheet-test arminkarimi$ git commit -m "added a test line to readme"
[armin/modify-readme-content 3b9959d] added a test line to readme
 1 file changed, 1 insertion(+)
Handling distractions or stash
Sometimes you are working on a small issue to simply investigate something. You end up writing some code without having any branches. All of a sudden,
- you need to attend to something else
- but you also don't want to lose your work
- and you are still not ready to create a branch
believe me, it happens. That's what the stash is for. You can simply stash your changes which basically puts your pending changes on the side until you are ready to get them back:
git stash --include-untracked
Using --include-untracked will add all untracked files to the stash, including newly added files.
MacBook-Air:simple-git-cheat-sheet-test arminkarimi$ git stash
Saved working directory and index state WIP on armin/modify-readme-content: 3b9959d added a test line to readme
And when you are ready to get back to it, you can get the last added item in the stash:
git stash pop
MacBook-Air:simple-git-cheat-sheet-test arminkarimi$ git stash pop
On branch armin/modify-readme-content
Changes not staged for commit:
  (use "git add <file>..." to update what will be committed)
  (use "git checkout -- <file>..." to discard changes in working directory)

        modified:   README.md

no changes added to commit (use "git add" and/or "git commit -a")
Dropped refs/stash@{0} (e22b9e832816c7d90990a3d1774c9e12e3bc4cbb)
stash works like a stack. You can stash more than one temporary change, and when you do pop, it removes from top of the stack.
Collaborate with Others
Share Code on remote git or push
We can never trust our local machines. It is always better to make sure our code is available in an online repository rather than our hard drive. Share (push) your code to the remote git repository with the following command (you must be in your branch):
git push origin armin/modify-readme-content
MacBook-Air:simple-git-cheat-sheet-test arminkarimi$ git push origin armin/modify-readme-content
Counting objects: 3, done.
Delta compression using up to 4 threads.
Compressing objects: 100% (2/2), done.
Writing objects: 100% (3/3), 285 bytes | 95.00 KiB/s, done.
Total 3 (delta 1), reused 0 (delta 0)
remote: Resolving deltas: 100% (1/1), completed with 1 local object.
remote:
remote: Create a pull request for 'armin/modify-readme-content' on GitHub by visiting:
remote:      https://github.com/arminkarimi/simple-git-cheat-sheet-test/pull/new/armin/modify-readme-content
remote:
To https://github.com/arminkarimi/simple-git-cheat-sheet-test
 * [new branch]      armin/modify-readme-content -> armin/modify-readme-content
This will create a new branch for your changes on remote git.
Request to merge or pull request (PR)
After you have created a remote branch for your changes, it is time to request to merge your branch with the parent branch. Actually, you can merge your branch with any other branch and do not necessary have to merge into the branch that you have created your branch from. But, personally I prefer a hierarchical approach to avoid resolving many conflicts down the road.
Each repository vendor has a different UI for dealing with pull requests. Here are a few links on how to create a PR on most popular git vendors:
Discover other branches or fetch
Your team mates contribute code all the time on other branches. Most branches are new and you need to make sure your local machine is aware of the remote branches. Git allows you to fetch remote branches:
git fetch
MacBook-Air:simple-git-cheat-sheet-test arminkarimi$ git fetch
From https://github.com/arminkarimi/simple-git-cheat-sheet-test
 * [new branch]      a-remote-branch -> origin/a-remote-branch
Now you are able to checkout the branch that was not originated on your local machine.
Comments from experience
- Keep your branch updated with the branch it originates from. I find it extremely helpful when I frequently get (pull) the latest changes from the parent branch.
- Similarly, before pushing your changes to the remote repository, pull the remote changes from the branch you will be merging to. This gives you an opportunity to resolve the conflicts if any, before creating your pull request
- When you push your branch to remote repository, it is available for other team members. You do not have to create a pull request to have it looked at.
- It is perfectly fine to create a branch out of other branches (not master). Specially if you are helping a team member solve a specific problem, create a branch from their branch, and then do a pull request to merge your changes to their branch.
- Git is a very powerful version control system, with so many commands and options for each. However, if you try to keep it simple and follow basic rules in branching and merging, you do not have to deal with very many special scenarios. Of course, it all depends on team size, team structure, and project structure.